Very few people develop their software from scratch. Why would they, after all, when so many others have already done the work for almost any algorithm you could think of? Rather than re-invent the wheel, it’s more efficient (and more fun) to work on the novel tasks in front of you and let someone else handle the technical details with a quick ‘import’.
But this strength of re-using software comes with a very great weakness: dependency management. What do you do when the module you’re importing upgrades to a new version? How do you ensure that your own code still works, and there are no unintended side effects of the upgrade?
Most people just handle these upgrades manually, and because of the effort that can be involved, this often means their dependencies are often several versions behind the latest release. This isn’t necessarily a bad thing, but it does mean you’re missing out on bugfixes, performance improvements, and new features. And you don’t need to! With some simple workflow automation, you can reap the benefits of CI/CD best practices and let your process work for you!
In this article, I’ll explain current best practices for dependency management in an MBD context. By the end of it, you’ll have enough familiarity with the process as whole to be able to implement your own production CI pipeline for managing, migrating, and testing dependencies! You’ll also have set up your own sample dependency migration pipeline, so you have a practical example to reference.
In part 1 of this article (you are here!), I’ll focus on the development part of the toolchain, where we restructure an original monolithic model to version its dependencies and build them on-the-fly. In part 2 of this article, I’ll add in a CI pipeline to automatically migrate and test our dependencies to the latest version. Here’s an outline of the steps we’ll be going through:
- Creating our original, unified model
- Separating out our model into main module and dependency module
- Serving our dependency module through a package-manager
- Migrating our main module to use the latest version of its dependency
- Testing the main module to validate the migration didn’t break anything
Step 1: Creating our Model
First things first, we need some models! I’m going to be shamelessly stealing the example my coworker, Thabo, has already developed, and build up from there. If you’re curious, the git repos have the fully-fledged example all worked out, but I’m only going to be grabbing the ‘core’ files to begin with. If you want to follow along, navigate to the first repo, and grab the swc_1.slx and start.m files (these files, by the way, were generated for MATLAB R2023b) from inside the src folder.
These two files will define my main unit, but they won’t run unless I also get the dependency library along with them. Navigate to the other git repo, and download the shared_module_a.slx inside the src folder, placing it in the same directory as the model from above.
Just to make sure nothing went wrong, go ahead and run start.m in your Matlab workspace, and then open and simulate swc_1:

Step 2: Separating Out our Model
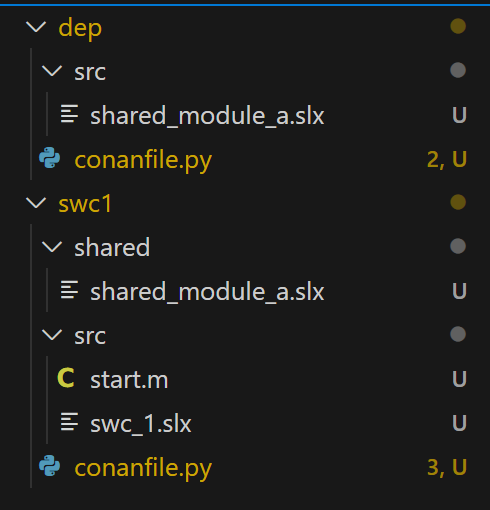
Now that we know they work together, let’s separate them, so that they can be versioned independently. You can delete any cache folders created by Simulink, and then structure the models into two separate folders

And from here, I’m going to create two separate git repos and commit them both. First, create the repositories in GitHub, using the web interface (they can be uninitialized/empty, and mine are set to ‘private’). Then, for both the dep folder and swc1 folders, initialize and commit them to their respective repositories:
git init
git add .
git commit –m “initial model commit”
git remote add origin https://github.com/btc-nathand/swc1.git
git branch -M main
git push -u origin main
Replacing the URL in both cases with the appropriate link to the repository you just created in the GitHub web interface.
Success! We’ve broken the link between our main SWC and its dependent!
Step 3: Serving the Dependency to the Main Module
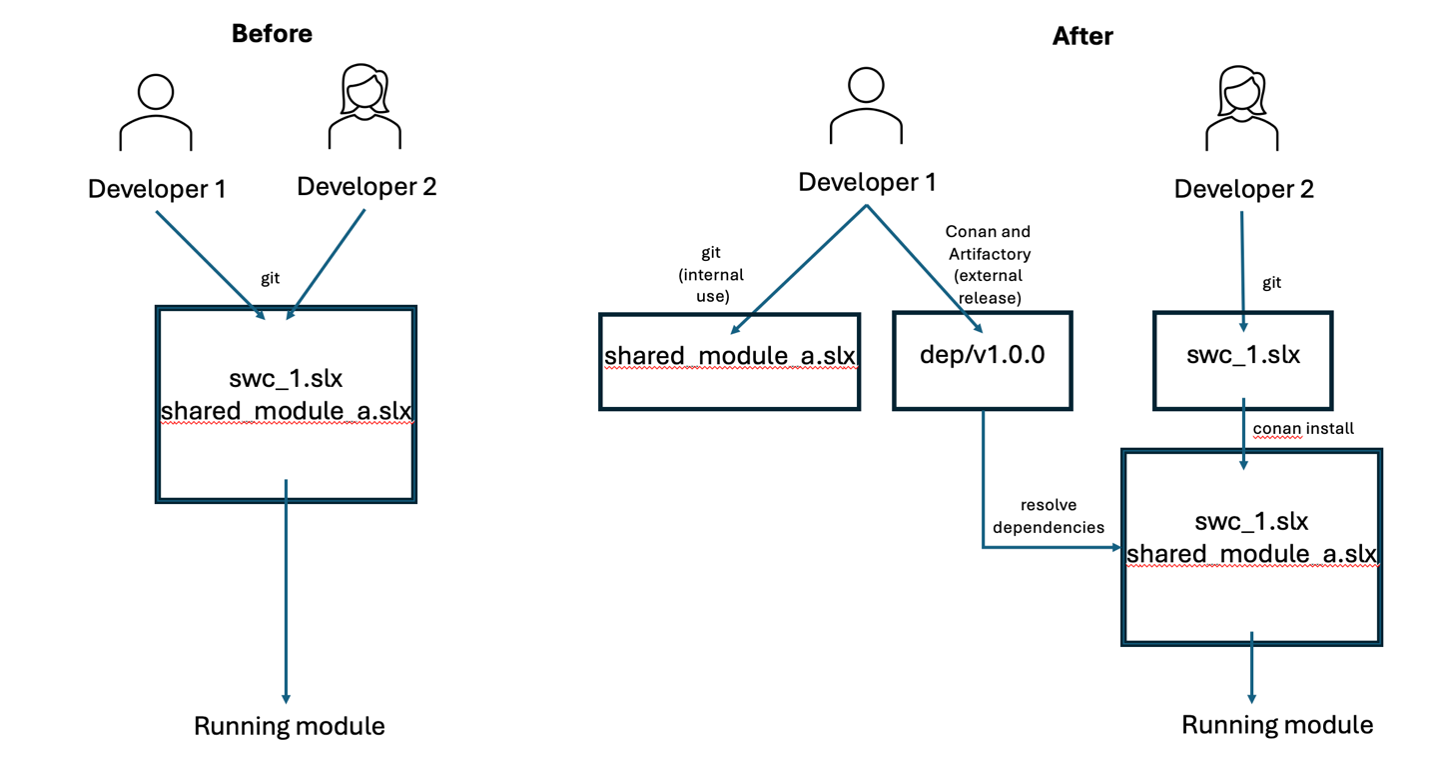
Developer 1 and Developer 2 work on their codebases separately. When Developer 1 is finished, he releases his code publicly; this lets Developer 2 pull it in as a dependency to her own code. This lets Developer 2 have strict separation of concerns between code she’s responsible for and code she’s just using, and also gives a way for her to explicitly track which version of dependent code she needs.
Having a way to separate out the development environment (my code!) from the dependency source (your code!) is vital here. While we could use something like git submodules, this would blur the line between responsibilities, and we still could (accidently or maliciously!) push unintended changes to the dependency. What we need isn’t just a way to import code from one place to another—we need a full-blown way of versioning and serving code as a ‘black-box’ with strict controls between unrelated projects. What we need is a package manager!
There are lots of mature, maintained package managers out there, and any one of those will work. One of the more well-known ones is JFrog’s Artifactory, which is a dual-bundle artifact serving tool with an environment definition tool called Conan, and I’ll be using these in this tutorial. First, download the latest Artifactory installer (on a real production workflow, this would be hosted on a separate server, but running it locally is perfectly fine for this example). Navigate into the app/bin directory and double-click on “artifactory.bat” to start up the service. Go into your browser and navigate to http://localhost:8081, where you should see a pretty, green welcome screen. Log in with the default username (admin) and password (password), and you’ll be prompted through some basic configuration options. Leave everything as default, and finally you’ll be greeted with the main loading page:

From here, we’re going to create a new repository to host and serve our dependency module. Configure it as a local Conan project and give it a unique key. Because we’re running all this locally, we don’t need to set up any user management permissions, but again, this would be helpful in a production environment.

Switch back to your IDE. To connect our git, where our dependency is stored, with Artifactory, where it’s served, we have to create a conanfile in the dependency module file structure. Create a file named conanfile.py, and put the following text into it, replacing the URL with your own repo. If you’re curious about the configuration options available here, you can read more on the Conan website.
from conan import ConanFile
from conan.tools.files import copy
class MyPackage(ConanFile):
name = “shared_module_a”
version = “1.0.0”
license = “MIT”
url = “https://github.com/btc-nathand/dep”
description = “Conan package for Shared Module A”
exports_sources = “*.slx”
no_copy_source = False
def package(self):
copy(self, “*.slx”, self.source_folder, self.package_folder, keep_path=False)
Save the file and open a terminal to finish the packaging. First, let’s do some restructuring, so that our project isn’t just a flat folder:
cd dep
mkdir src
mv shared_module_a src
Of course, we need to install Conan to have it available. We’re also going to need to finish our configuration by telling Conan where our dependency is supposed to go when we release it, and then finalize our changes and push them as our first commit:
pip install conan
conan profile detect
conan remote add artifactory http://localhost:8081/artifactory/api/conan/dep-repo-conan
conan create .
conan upload shared_module_a -r=artifactory
And with that we’ve successfully uploaded our dependency! This means it’s available for anyone to download from our server; the next step is to tell our main SWC how to find and install it, so that we can create a complete running module.
We’ll need to go back into our main SWC, and create a conanfile, but instead of uploading to the Artifactory repo, we’ll point it to pull and merge in the dependency with our own model at build time. Create another conanfile.py, with the following contents:
from os.path import join
from conan import ConanFile
from conan.tools.env import VirtualBuildEnv, VirtualRunEnv
from conan.tools.files import copy
class SWC1(ConanFile):
name = “swc_1”
version = “1.0.0”
license = “MIT”
url = “https://github.com/btc-nathand/swc1”
description = “Conan package for SWC1”
requires = “shared_module_a/1.0.0”
def generate(self):
# disable generation of scripts in the build folder
VirtualBuildEnv(self)
VirtualRunEnv(self)
# copy model files from dependencies root folder into
# folders with the dep-name inside the build_folder
for dep in self.dependencies.values():
copy(self, “*.slx”, dep.package_folder, join(self.build_folder, ‘shared’))
We’ll want this at the root level of swc1 to define our project. Then, much like with the dependency, we’ll restructure our main module project hierarchy, and create the conan project:
cd swc1
mkdir src
mv swc_1.slx src
mv start.m src
conan create .
Finally, tell Conan to pull in the dependencies it needs from our Artifactory server:
conan install . -r artifactory
Just to make sure that everything is pieced together, I’m going to look at my workspace and confirm that my missing dependency did, in fact, get downloaded:

You’ll notice that now, in addition to the files we added in and moved around by hand, we have a ‘shared’ folder next the ‘src’, which contains our resolved dependency. Great! Our Artifactory server is doing its job. To make sure that this doesn’t get checked into git (it’s supposed to be resolved at build time—ideally, a local initialization script will run our ‘conan install’ command along with doing a git pull to make sure everything is up to date), lets pop in a quick .gitignore:
# ignore anything from the simulink cache & all generated files
*.slxc
*_ert_rtw/
slprj/
*.html
# ignore shared modules that are added by the package manager
shared/
conan.log
You can go ahead and copy over the same .gitignore into the dep repo as well.
Great! We’ve just finished setting up our system so that it can successfully upload and resolve dependencies. Now’s a good point to save everything through a git upload.
We’ve done a lot, so let’s summarize our status so far. From a developer perspective, everything’s been finished:
– The maintainer of dep, when he’s done making his changes, in addition to checking in to git (for internal maintenance), also makes them available to other teams through Artifactory (for external linkage), by doing a ‘conan upload’
– The maintainer of SWC1, when she’s ready to develop her software, simply declares her dependencies, and then runs a ‘conan install’ to bring all the defined dependency versions into her ‘shared’ folder


